Step-by-Step Selective Pallet Racking Installation Guide
Selective pallet racking is one of the most versatile and economical storage systems for warehouses and distribution centers. This system allows easy access to all pallets, making it perfect for quickly reaching a large selection of different SKUs or materials in your warehouse. Proper installation is crucial for maximizing efficiency and ensuring safety.
This guide will help you install selective pallet racking. It provides best practices, and steps, addresses challenges, and offers expert tips.

Preparation for Selective Pallet Racking Installation
Selecting the Appropriate Selective Pallet Racks
The first thing you need to do is decide what type of pallet rack suits your storage needs. Consider factors such as the type of goods, weight, and volume.
You can change the selective pallet rack to accommodate different sizes and weights of products. This makes it ideal for a wide range of materials. In this blog, we will focus on the teardrop pallet rack as our example style of pallet rack.
Assessing the Warehouse Layout
 Before you begin any installation, you need to thoroughly assess the warehouse layout. Measure the whole area, including rack sizes, aisle space, ceiling height, and any obstacles that could slow down installation. Also, check the area for trip hazards. You’re going to be moving a lot so it's best to keep your workspace clear.
Ensure the floor is level and capable of supporting the weight of the loaded racks. If necessary, reinforce the floor to prevent damage and ensure stability. I suggest working with a consultant like the team at Warehouse1 throughout your project. An experienced project manager can help prevent unexpected problems. Overall, this approach leads to faster results and ensures a smoother process and quicker results.
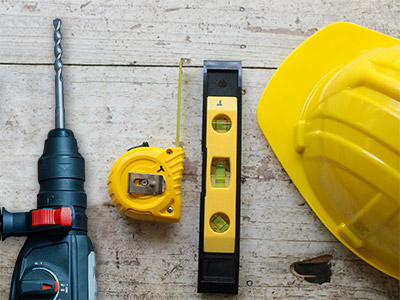
Gathering Necessary Tools and Materials
Make sure you have all the necessary tools and materials before starting the installation. Common tools include:
 Extra people & lift equipment to help with the assembly
- Torque wrench
- Tape measure
- Chalk line
- Level
- Permanent marker
- Rubber mallet
- Anchor bolts
- Beam locking pins
- Shims
- Hammer drill
- Masonry drill bits
Safety Equipment
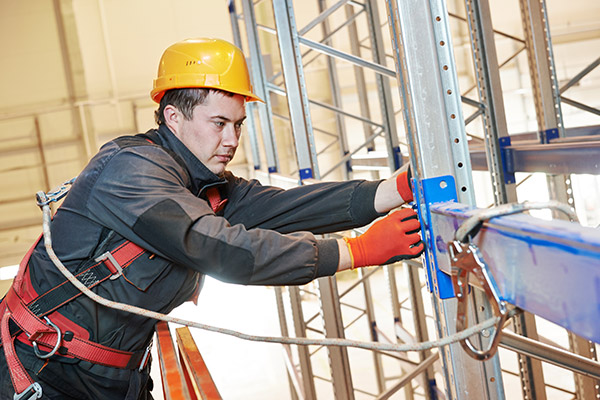
Safety should always be at the top of your priority list. Equip your team with personal protective equipment (PPE) such as hard hats, safety glasses, steel-toed boots, gloves, and fall protection.
Pallet rack installation is noisy, it’s heavy, and can have sharp edges or even fall during assembly. Always follow OSHA rules and local safety standards to reduce risks during installation. Keeping yourself and your team safe should always be your number one priority.
Step-by-Step Selective Pallet Racking Installation Guide
Step 1: Unpacking and Inspecting the Pallet Racks
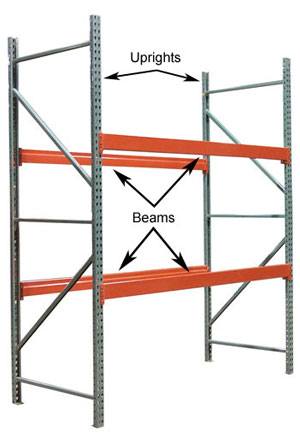
The first thing you should do is unpack all the components of your system and inspect them for any damage. Verify that you have all the required parts, including uprights, beams, decking, pallet supports and hardware. Your supplier should have provided a bill of materials you can use to do this.
Remove and replace any damaged or missing parts before proceeding. Using broken or damaged parts in your system is dangerous. They can fail and cause damage to your warehouse and equipment, leading to loss of products and materials. Most importantly, it can seriously hurt or even kill someone on your team.
Step 2: Assembling the Starter Bay
Ensuring the accuracy and stability of all pallet rack components is essential. The main part of a pallet rack system is the upright. Most uprights are ready to use with welded footplates and bracing, but some need assembly with bolts from certain manufacturers.
Correctly assembling, aligning, and tightening bolts is vital for the stability and safety of your pallet rack system. Most suppliers will give you this information when you buy the system.
 Assemble the starter bay
- One of the first things we recommend doing is marking your beam levels (elevations) on your uprights.
- Use a sharpie and tape measure to mark where you want beams to attach to the uprights. Repeat this on both the front and back sides of uprights. This will help ensure proper beam placement and save time when installing your beams.
- Planning your elevations before assembling selective racking, especially for larger-scale projects, is a smart idea. This will save you time and reduce frustration when positioning the beams.
- Avoid exceeding the load capacity of the racks. Overloading can lead to structural failure and pose serious safety risks. Make sure when you're planning your warehouse layout, that you're planning around what you'll put on your selective storage system.
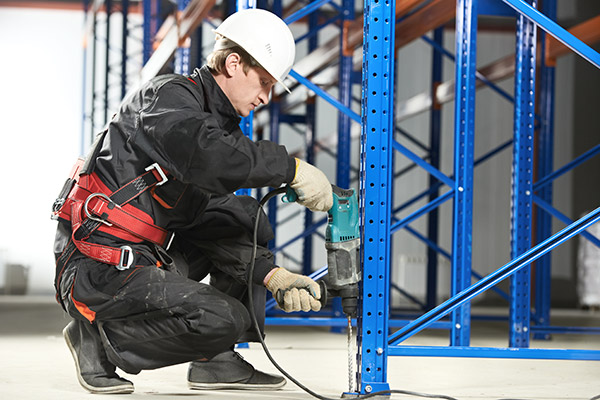
Step 3: Install the Beams
Next, we will install the beams onto the uprights. It helps to have extra hands for this. A team member should hold the upright in place, either by hand or with equipment, depending on its height. Always remember to prioritize safety during this process.
 After the uprights are positioned and in place, install the first beams at the highest level you marked with your sharpie.. This creates a stable structure that is easier to work with.
- If your beam has safety clips, make sure they fully engage when you seat the beam. If the clip is broken or missing, you can use a J-Lock instead. Just insert it into one of the empty holes in the beam clip for added safety. Do the same steps for the other side of the upright and the rest of the beam heights until you finish the starter bay.
- If a beam doesn't fit properly, double-check your measurements and elevations before proceeding.
- Occasionally, some pallet rack beams just don't want to cooperate. This is where your rubber mallet will come in handy. Give your beam a couple of taps on either side and it’ll seat in no time. (all kidding aside, you should do this as a standard to seat all your beams)
- Don't anchor the racking until everything is square and plumb. You'll likely need to adjust the alignment, so avoid the extra work.
Step 4: Mark Out a Straight Chalk Line
Now that we have a fully assembled starter bay, we need to mark out a straight line. This will help our add-on sections stay mostly in line with your layout as we build them.
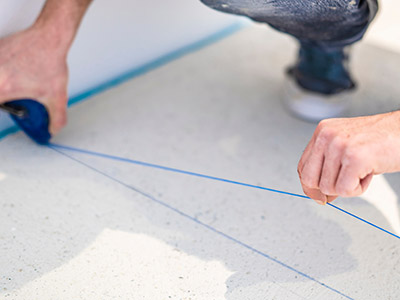 Push your assembled starter bay back several inches from its installation point.
- Take a chalk line and run it the full length of the installation and snap out a straight line that will give you a good point to build off.
- Finally, slide your starter bay back into position and even to the chalk line you just laid out.
Step 5: Build Your Add-on Sections
It’s now time to start building your add-on sections.
 First things first, mark your beam elevations on your uprights for your run as explained in step 1.
- Have a team member hold the next upright in place relative to the predetermined beam length. This may require a forklift to help hold it in place depending on the size of your upright.
- Put one beam on each side, depending on the size of your upright and height, either at the top or at waist level. The goal here is to stabilize the upright so you can place your remaining beams into your assembly.
- Rinse and repeat until you complete the first run of your selective pallet rack.
- Remember to keep your uprights lined up with your chalk line as you assemble it. This will make it much easier to square everything up before you begin to drill and anchor your footplates to the floor.
Step 6: Square and Plumb Everything Up
Now, one of the most important things to do is get your rack into alignment. A rack that’s not square or properly aligned can be a dangerous liability. Like an unsecured rack hit by a forklift, it could fail catastrophically.
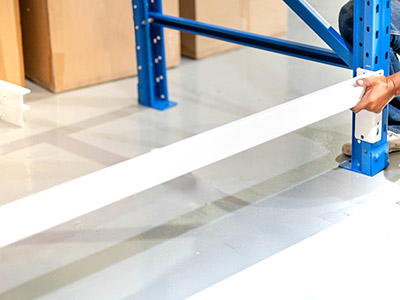
- Check your plumb, use a level, and measure vertically / horizontally on each side of your uprights as seen in the video below. Generally, a deflection of up to ⅛ inch per 4 feet is acceptable for vertical alignment. However, if the deflection exceeds this amount, adjustments will be necessary.
- Square it up. Measure the diagonal distances between opposite corners of the rack to check for squareness.
- Use Shims. If your uprights are out of alignment, you can use shims to get everything straight and level. Make adjustments by inserting metal shims between the footplates and the floor until everything levels out.
After verifying that the uprights are level, in place, and match your layout or engineered drawings, double-check everything. Better to check twice and drill once than to check once and drill twice. Trust me, the building owner and your floor will appreciate it.
Step 7: Securing the uprights
- Make sure that you use the correct anchors. Different racks in different regions will all come with their own specifications and requirements. Make sure you choose the correct anchor and size for your specific job. In general, you should only use wedge anchors or strike anchors when securing your equipment, and make sure you drill to the correct depth.
- The next question is, how many anchors per footplate do you need? Well, for most installations one anchor per footplate will be sufficient. But in a seismic zone, for example, you may need up to four per footplate.
Step 8: Customize with Pallet rack accessories
Warehouse1 has plenty of accessories to add to your brand new storage system. Below are just a few to consider when getting your warehouse up and running as efficiently as possible.
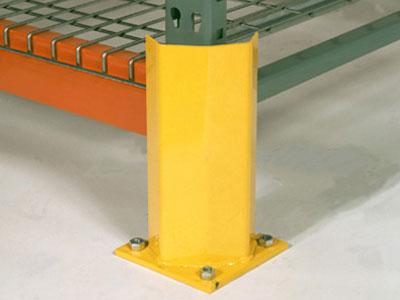 To protect that investment, column guards will help protect uprights from impacts.
- For back-to-back runs of pallet rack, using row spacers is a must-have item.
- Wire decking provides additional support and prevents items from falling through. Wire decking will allow for better air circulation and is often required by fire safety regulations.
Congratulations!
You have optimized your warehouse with a new selective pallet racking system. Enjoy faster order fulfillment, lower labor costs, and better inventory control!
Warehouse1 has a team available with decades of combined experience. Let us tackle your toughest questions and needs.
Our #1 goal is to make sure we take care of you, the customer.
If you are ready to transform your warehouse, contact Warehouse1 today for expert care and high-quality pallet racking solutions. Our team is committed to helping you optimize your storage space and streamline your operations.
Email: Send us a quick message for a custom quote or assistance.
Phone: Give us a call for immediate support, 1-888-558-1830
- Looking for a quote? Click here.
- This free warehouse layout checklist will help you create an effective and efficient layout design for your next big project.
Warehouse1 can provide everything you need to brainstorm, design, engineer, and check off that list to build your warehouse of the future. Below are some of the things we offer.
We Specialize In Custom Warehouse Builds, Utilizing both New and Certified Used Equipment
Layout Design Services: Our seasoned professionals can design an optimized layout for your warehouse.
- Warehouse Relocation Services: Time is money. Warehouse1 can get your pallet racking out of your old warehouse and set up in your new one, quickly and efficiently.
- Warehouse Liquidation: Going out of business, relocating, or making upgrades? Warehouse1 will purchase your used materials. Give us a call! Let us put some money in your pocket and lighten the workload. We offer fair prices and fast service.
- Engineered & Stamped Drawings: Do you need your project drawings stamped? Warehouse1 has a solution for that as well. We can get your engineered drawing stamped and approved in no time.
- Material Fabrication: Custom builds are in our wheelhouse as well. Our professionally staffed fabrication shop can produce just about anything you need. Call or email us today to see what Warehouse1 can do for you!
At Warehouse1, our commitment is to help you discover the ideal storage solution for your facility. Maximize your warehouse efficiency with our premium pallet rack storage systems and dedicated support.
We look forward to assisting you in optimizing your storage and enhancing your warehouse operations! Contact us today, to get started on improving your warehouse efficiency.


